Good morning crafters!
Who else is loving the dreamcatcher trend that is catching on lately? They are everywhere; tattoos, drawings, pillows, and of course hanging in your windows and on your walls!
Today I’m going to help you make your own crochet center dreamcatcher because they are super easy to make at home and purchasing one of these babies will cost you an arm and a leg.
Supplies you will need:
- Crochet center (tutorial is below)
- Yarn or thread to finish the center / wind the rim / accessorize 🙂
- Some sort of circular rim **Secret hint** I bought a tomato plant support at the dollar store for $1.25 and that gave me three rings to use (.42 cents each!)
- Beads
- Glue (to seal in some of the ends)
Crochet Dreamcatcher Center
I used sock yarn because I’m not smart and didn’t realize how ‘felty’ it would be. It’s a pretty colour though 🙂 I would recommend using cotton or crochet thread!
I used Patons Kroy Socks FX in ‘Cameo’ and a 3.75mm hook.
To begin you will need to make a magic circle. If you forget how just click over to this tutorial where I show it in the first step.
Into the magic circle:
- Chain 3 (counts as a DC), 2DC, CH1.
- 3DC, Ch1, 3DC, Ch1, 3DC, Ch1, 3DC, Ch1, 3DC
- This should leave you with 6 clusters of 3DC. Now you can close the magic circle.
- Chain 1 and Slip Stitch into the top of the first Chain 3 to complete the first round.

Round 2
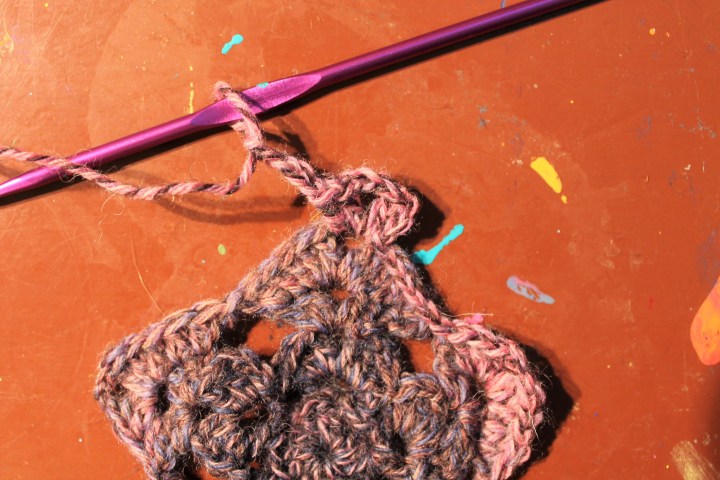
Chain 6. (counts as 1DC and 3CH) 1DC in same stitch. Chain 1.
**Skip next 2 stitches and (DC, CH3, DC) into next stitch (indicated with orange pin)
 Chain 1.** Repeat from ** to ** until end of round.
 Slip Stitch in 3rd chain of the first DC to end the round.
Round 3
SS into next space. CH3 (counts as a DC), 2DC, CH3, 3DC into same space.
 *Slip Stitch into next space (indicated by orange pin). 3DC, CH3, 3DC into next space.*
Repeat from * to * around.
 SS into the last space. SS into the 3rd CH of the first DC.
SS into each stitch across until you get to the next space.
Round 4
Chain 3, (DC, CH3, 2DC) into first space.
 Chain 5. *2DC, CH3, 2DC* into space on top of next petal.
 Chain 5. Repeat from * to * until end of round.
 SS into 3rd chain from the CH3 at the beginning of round to end round 4.
Round 5
Chain 3. (counts as a DC), DC in next DC
Work ** (3DC, CH3, 3DC) into the top of the last petal.
 Sorry the picture is blurry, I didn’t realise until I had taken all the pictures!
DC into each of the next 2DC. SS into next space. DC in each of the next 2DC.**
Repeat from ** to ** around until end of round. SS to close.
Round 6
SS in next 4DC and in next space. (Basically SS until you are at the point of the last petal)
(2DC, CH3, 2DC) in same space.

**CH5, SC into the SS from the previous round, CH5**
Repeat around. SS to end the round.

Blocking
Wow look at how much better it looks blocked!
I know I say this every time but you need to block this work really badly! It curls up while you are doing it and it won’t look as beautiful if you try to put it in the dreamcatcher without blocking it first.
Start Weaving the Dreamcatcher
Tie the yarn anywhere onto the rim. Wrap it around like this:

Once you go around the rim once pull down one of the loops.
 Pull the yarn through the back of the loop.
 Then pull the thread through the loop you just made:

Putting the center into the dreamcatcher
I recommend leaving your crochet center with all the pins in it. It is already stretched out perfectly and held in position so just place your ring around it and continue to weave your string around like you did for the rim of the dreamcatcher just weave into the crochet center at the points of the star and any other spot that needs to be held in place.

Now you are done weaving it’s time to accessorize!
I wrapped embroidery thread around the rim (just seal off with a dab of glue). I also made bead strings with a bunch of seed beads and embroidery thread. I just put some white glue on the end of the thread so that it hardened into sort of a needle and it was really easy to thread the beads on! Fishing line would also work great!

Add whatever other embellishments you have around the house; feathers, fabrics, etc. Be creative!
Subscribe to my monthly newsletter to get awesome project inspiration every month and to be entered into my giveaway for this super mini crochet center dreamcatcher keychain!
 Find out more about the MatayaMade newsletter (including how to join) right here.
I would love to hear about how you personalized your dreamcatchers in the comments below. Also feel free to ask any questions about this tutorial if you are running into trouble with any of the steps.
Happy Crafting!


