

Hello crafters!
This month I have been trying to put together a crochet sweater for my trip to England! I want a cozy sweater that I can hibernate in at the airport. I searched high and low to find an easy way to add a hood to my crochet project and EVERY pattern I could find just made a rectangle and joined the corners. While this method is super easy and quick it leaves you with a very pointy hood which I wasn’t really excited about.
In this post I’ll show you how I created a more naturally shaped hood for my sweater and how you can add one to your sweaters too!
This pattern is not going to go into specifics of stitch counts and rows because it does not come with a sweater pattern. This is a general guide on how to shape a hood so that it fits both your sweater pattern and your head shape; in other words this pattern is completely customizable 🙂
Supplies
- Yarn that matches your sweater
- Crochet hook in same size that you used for your sweater
- Stitch markers (I use paperclips because I am cheap 🙂 )
- Yarn needle
Figuring out where to attach your hood
This method starts working your hood around the collar of your sweater and works it’s way up to the top.
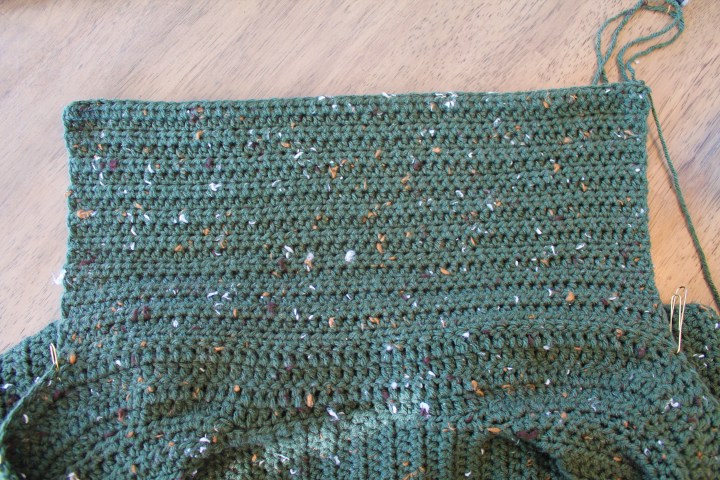
Once you have decided how far around your sweater you want your hood to go use stitch markers to mark where each side of the hood starts and ends. This sounds really confusing so here is a picture!


Typically hoods start just in front of the shoulder seam so you can use that as a guideline.
You will notice that my sweater already has a sort of collar on it. That is just the pattern that I used but you don’t need to have a collar on your sweater to be able to attach a hood.
Starting your crochet hood
You can use any stitch that you would like for your hood. I would suggest using something that matches your sweater. My sweater is half double crochet so I used that stitch for my hood.
Begin by working one row from your first stitch marker across to the second stitch marker. Continue to work rows back and forth until you have a rectangle that reaches the top of your head. The rest of this design isn’t going to make your hood much taller so you want it to be big enough just with the regular rows.
Tapering your crochet hood
This is the part where we change it up a bit! Normally you would continue to crochet in a rectangle and then fold your front corners together which leaves you with a very sharp corner on the back edge of your hood. What we are about to do is taper to shape the back of the hood into a slant.
First you need to count how many stitches you worked across your rectangle. You will use this number to figure out the rest of your hood design so I would suggest triple counting! I just counted each stitch as I worked my last few rows so that I was certain.
My hood happened to conveniently be 50 stitches so I will use that as an example.
If you have an even number of stitches:
Take your number of stitches, subtract 2, and divide by two. This is how many stitches you will work for your first row.
I have 50 stitches so my first row will be 24 stitches (50-2 is 48. Divided by 2 is 24)
If you have an odd number of stitches:
Take your number of stitches, subtract 1 and divide by two. This is how many stitches you will work for your first row.
- Turn and chain the appropriate turning chain for your pattern. Work your first row of stitches (24 for me!)
- When you reach the end of the row do your turning chain and turn your work. Then skip one stitch, work into next stitch and each stitch across to the end. You should now have one less stitch than you started with. I have 23 stitches.
- Work a turning chain and turn your work. Work one stitch in each stitch across skipping the final stitch.
- Work a turning chain and turn your work. Skip one stitch and work a stitch in each stitch across to the end.
- Repeat steps 3 and 4 until your hood is the desired size. Tie off.

I ended up doing 7 rows with the above steps but it will depend on your yarn size, hook size and head size! So I would suggest trying it on as you go.
Working the other side of your crochet hood
After you have completed the above steps you will have one side of your hood finished but you will still need to mirror what you have just done on the other side. Attach your yarn where the pink dot is in this picture:
Then repeat the above steps starting with step 1.

Finishing your crochet hood
To finish your hood you simply fold the two sides together so that the seams line up. Using a piece of yarn and your yarn needle work mattress stitch from the back to the front.


Your hood is complete! You can add any sort of edging to your hood to really bring it together with the rest of your sweater. To finish my sweater I worked a row of crossed half double crochet and then a row of crab stitch around the entire edge including the hood.

I hope this tutorial has helped you finish off your sweater projects and would love to hear about them in the comments below. Also feel free to comment if you are confused about any part of my tutorial!
Happy crafting!

Thank you, thank you and thank you again, Mataya. I have wondered the exact same thing about making a good without the point . You have done a great job explain ing . I have been knitting a rectangular shawl and want to add a hood. This will translate perfectly to knitting. I knit and crochet with a mad passion, and quite often I mix the two in one project. Thanks again.
Hi Sherri! Thank you so much for your comment 🙂 I’m glad I could help!
Mataya
Hi Mataya, thank you so much for this, as a newbie i was really struggling to adapt what was a huge hood on a cardigan for my daughter,your instructions were so concise it was really easy to do and the finished result was brilliant.
Hi Pat, thank you for your sweet comment 🙂 I am happy to hear that I could help you!
I have been looking for a pattern that’s just for a hood, and I think this is perfect. Thank you! I also really love the sweater that you were making the hood for. Would it happen to be a free pattern that you could share with me?
Hi Christine!
Thank you so much for the comment; it made my morning! The pattern that I used for the sweater is from hearthookhome.com and it is called the Cozy Coed Cardigan Pattern. It was not free, I believe it was a five dollar pattern. Once purchased you can download it immediately as a pdf. I used this pattern to start my sweater and then added my own sleeves and pockets.
Thank you for the great instruction! Can you tell me approximately how much yarn is needed for the hood? I understand it will vary based on weight, size, etc.
Hi Penny!
You’re so welcome 🙂 I used Loops and Thread Impeccable Tweed yarn which is a medium(4) weight yarn and if I remember correctly I used about half a ball for this hood which is 95 yards. Hope this helps!
Will this work for a v neck sweater??
Gonna find oyt as im going to try!
Hi Laura! There’s no reason why this shouldn’t work with a v neck sweater as you can start and end the hood wherever you would like 🙂
OMG! Thank you! I was struggling to find a guide that wasn’t just a pattern or a video, and that had a shaped hood rather than a rectangle. I could tell from looking at hoodies I own that I didn’t want a rectangle, but couldn’t figure out what I did want. I’m excited to start this since I wound up having yarn left over from the sweater I just finished.
No problem Andrea! Your comment made my day, I am so happy to have helped 🙂
Could this hood be done on a scarf/cowl and make the hood detachable? I like hooded cowls but do not like the point.
Hi Paula, thanks for checking out my post 🙂 I’m sure this hood would work perfectly for your cowl! It could easily be attached with buttons along the first few rows to make it detachable!
I finished my second hoody cardigan, and I am so impressed with this method. Thank you for for sharing it!
You are very welcome, I am so happy to hear that it was useful for you 🙂
Would this work on a Poncho
Hi Ginny!
I don’t see why this wouldn’t work on a poncho! My next project to try with this method is a shawl so I think it can pretty much work with any project 🙂 Happy crocheting!
I bought a coat that has no good and I want to crochet one. I too do not like the pointed hood. This is so simple thank you for making it a free post.
Hi Holly! Thank you for your comment, you are so welcome 🙂
Dear Mataya,
I bought a great used cowichen knit sweater at the thrift shop. It has a uneven collar, but I can live with that!
What I’d like to do is start from the collar and crochet it into a hood.
Any idea how/ where to be begin?
I could just crochet a hood and stitch it to the collar, but you seem to be awesome at these things, so I thought I’d ask for your advice.
❤️ Kelly
Hi Kelly!
You are so sweet, thank you 🙂 What a great thrift find! Judging from the photos that you sent it looks as though the collar was the last part that was added on so I might attempt unraveling the collar and starting fresh with the crochet hood.
If unraveling seems a bit risky, you could always start the hood from the inside edge of the sweater and work it separately from the collar so that the collar wraps around the base of the hood. (Hopefully that makes sense!)
I love your idea to add beads! Good luck!
Mataya
Genius!! Thank you. Not a fan of the pointy elf hoods, so this is perfect!!
You are very welcome 🙂
Wow! This was such a well done tutorial. I am a beginner and had made a lotus vest for my daughter. I was so proud of myself ☺️ Then she asked if I could add a hood YEKS! I told her a would search for a tutorial and PUFF there you were. THANK YOU SO MUCH! Having the tutorial free was a bonus because being a beginner I did not want to spend money on a pattern when I had no idea if I could do it. Your tutorial made my day!!
Thank you so much Judy, your comment made my week! Happy that I could help 🙂
Absolutely brilliant tutorial, thank you so much for sharing.
I just made myself a cardigan (first time designing my own pattern) but could not figure out how to add a hood that wasn’t too ‘pointy’, then I came across your site and BAM! it all fell into place. 🙂
Wow thank you so much 🙂 I am so happy that I was able to help! Congratulations on making your own pattern 🙂
Yay, thank you. I too did not want a pointy hood. I am making a Cowl Neck Hoodie. I was looking for a whole day and glad I found this one. Now I’ll probably make a couple for myself. Thanks again!
You are so welcome, sounds cozy 🙂
I’m making a cardigan that has a ribbing, should I add the hood before I do the ribbing and do the ribbing around the hood or should I add it after? Thanks so much for the pattern!
You’re welcome! It would work either way so it is really a matter of your personal preference! I would probably do the hood and then the ribbing around just to make the cardigan have a completed look 🙂
This is what I needed exactly. I have a sweater with no good and it definitely needs one. Thanks so much this makes so much sense. You helped so much
Wow Michelle, thank you for your kind words 🙂 I’m so happy to have helped!
Terrific post, I’m looking forward to using this for a sleeveless hoodie that I’m planning to make without a pattern. Thanks!
Thank you so much Laura 🙂 I am very happy to help!