Handcrafted Projects and Ideas

Receive MatayaMade's newsletter packed with tutorials, handcrafted ideas and FREE giveaways! Newsletter subscribers also have unlimited access to the Members Page Sign me up!


Hello Crafters!
One of the best parts of going to my mum’s belly dance performances is the chance to see all the beautiful costumes! Some of those costumes can cost you an arm and a leg so naturally I decided to try and make one myself from a regular affordable bra!
Let’s get right into it!

Don’t mind the messiness of my crafting desk 🙂
I used a light scarf cut down the middle as my tie backs. You want to width of the strips to be at least as wide as the thickest part of the back of the bra.
The first thing you will want to do is seal the edges of your fabric so that they won’t fray over time. I used Fray Check which is basically a sealant but if you have a sewing machine you could always just sew a seam down the edges.

Sew the first end of your fabric strip to the front edge of the bra. Fold the edges of the fabric under itself so that it is the same size as the bra band. Pin the fabric in place to help you sew it on.
I wasn’t thinking and forgot to take a picture of this step but here it is after the edges have been sewn under.

Once you reach the fastener sew a line straight up and down to make sure the tie won’t come loose. Leave the rest of the tie loose so that you can fasten the bra and tie the straps over top of it.
The most important part of most belly dance costumes is jingle and shine! That’s where the coins come in. You can buy coins at a lot of online dance supply stores. There are a variety of qualities including real coins for the dedicated costume designer. I found the best deal on Etsy from Bellymix. I am not promoting this seller or that site I just shopped around for a bit and these ones seemed to be the best price for the amount that you receive.
To attach the coins I used a piece of thread that is double the length of how low I want the coin to dangle and then add a few inches onto that length so that it is easy to sew on after.
Start by threading the coin onto the middle of the thread. Then bring both ends of the thread together and thread seed beads onto both threads. (I used 5 beads per string but it is really your preference!)
Boil the kettle and put a good tv show on because making these coin strings will take you some time. To cover the top edges of this bra I used about 100 strings.

To attach your coin strings to the bra simply thread the string onto a needle and poke through the edge of the bra from front to back pulling tight enough that the thread is not visible from the front. I triple knotted each coin string in the back so that all that shimmying and shaking wouldn’t work them loose. That’s 300 knots!

I had a few extra coin strings so I attached a few to the center of the bra for some extra jingle 🙂
The hanging chains are definitely what bring this dance bra together and by convenient coincidence they were also the easiest part! You can probably find chains or links from any art store in the jewelry department but I’m sure they are pretty expensive. I found these costume jewelry necklaces at the dollar store! Each necklace cost about 3 dollars and I simply removed the closing links so that I was left with just chains.
Simply sew through the chain links to fasten to the bottom band of the bra. Just be careful with your chains as the links on these ones weren’t completely closed so the thread would keep falling out. I just grabbed a pair of pliers and cinched the links shut that I was sewing through 🙂
You can use any beads that you have around, I chose these glittery purple ones because the colour matched and when it comes to stage performances you definitely want beads that will glimmer in the spotlight!

To make the bead strings along the bottom of the bra cups attach your thread where you would like the bead string to start. Then simply string the entire thread with beads until it is long enough to reach to the other side of the cup. Then send your thread through to the back of the bra and fasten VERY WELL! If you are concerned about your bead string falling off then you can work some small stitches around the thread from beginning to end to really secure it in place.
Put as many bead strings as you want! After looking back at this project I wished I had added a few more beads to the cups for extra glimmer.
This project was so fun (dance costume projects always are!) and my mum was so excited when she opened it. I hope this tutorial helped you out a bit with your costume inspiration.


Please feel free to leave your comments, question or ideas below in the comment section. I love hearing feedback from my fellow crafters!
Also I currently have a homemade headache salve giveaway going on! YAY!

To be entered you simply need to be subscribed to my awesome monthly newsletter. Check out the link to learn more about my newsletter. If you already subscribe to my newsletter you are already entered!
Happy crafting!


Hello crafters!
As always the spring weather is a making time fly by! It feels like we just celebrated Mother’s Day and now we are a week away from Father’s Day!
I can’t really buy anything for my dad because he already has everything he needs so I figured I would make him something that he wouldn’t think to buy. My dad suffers from migraines and sometimes they are so bad he has to turn off all the lights and go and lie down in silence. I really wanted to give him a solution and I love finding new essential oil home remedies so I started looking up which essential oils are beneficial for migraine relief.
I whipped up this migraine relief salve using just essential oils, coconut oil and a touch of beeswax to firm it up a bit.

Making this migraine salve couldn’t be easier! All you need is a small dish to mix in, a spoon, your ingredients and a small air tight jar to store your salve.
Start by measuring your 10 tbsp of coconut oil into the dish. Then add your 1 tbsp of beeswax to the coconut oil. Simply heat the two together in the microwave at 30 second intervals until melted. You will want to break the beeswax up a little bit with your spoon before heating because it takes longer than the coconut oil to melt so if you leave it in one piece it will take a lot more heating time.

Once you have melted your oil and wax together simply drop your essential oils into the mix. Give the whole thing a good stir to make sure the oils are evenly distributed.
Pour your salve into a jar and leave it out to set. If you are in a rush you can leave the jar in the fridge with the lid resting on top so that it can set faster.

I picked each one of these essential oils specifically to benefit people with a migraine. Of course I’m not a doctor, I just researched essential oil benefits and these ones seemed best suited to this salve. Feel free to experiment with your own amounts and types of essential oils to make this salve your own!
Eucalyptus cleanses the body of toxins and clears out the sinuses relieving pressure that may be the cause of your headache. This amazing oil can also soothe upset stomachs which some people have as a side effect of their migraines. The smell of eucalyptus always makes me think of the spa so that is an added bonus 🙂
A lot of migraines and headaches are caused by tension and stress. Perhaps the most well known oil for stress relief and relaxation, lavender oil is a definite must in this salve.
Frankincense has very strong anti-inflammatory properties which makes it an excellent choice for headache relief. Some sources even say that putting a drop on the roof of your mouth instantly relieves headaches but I think I will stick to using my salve!
Peppermint cools your skin instantly which can provide some immediate relief. Peppermint also promotes blood circulation and will be a huge help with tension headaches.
Just like lavender the scent of lemongrass can be very soothing and calming. It has a mild sedative effect which can help you sleep off that migraine! Lemongrass is also an all-natural analgesic (pain-reliever) 🙂
Simply rub a small amount of salve on your temples and forehead when you have a headache or feel one coming on!

Thank you for reading through this post and I hope you will benefit from this recipe! I am super excited to announce that this headache salve is my latest GIVEAWAY! To win your own MatayaMade migraine relief salve simply sign up for my monthly newsletter right here.
And don’t worry if you are already subscribed to my newsletter you are automatically entered into this and every other MatayaMade giveaway 🙂 The winner will be announced by email so keep your eyes on your inbox!
As always I would love to hear your comments or questions below.
Happy crafting!

Hello crafters!
This week’s tutorial isn’t exactly a diy craft project but I love this marshmallow fondant recipe so much that I have to share it with you!
Any cake makers out there know how expensive fondant can be. Buying a couple of pounds of fondant is about twelve dollars depending on where you get it and doesn’t taste good at all! This recipe will cover an 8 – inch cake (with leftovers!) and will cost you no more than six dollars! Not to mention it tastes so delicious that you will actually want to eat it 🙂
Combine the marshmallows and water and microwave for 1 minute. The marshmallows won’t be totally melted, just a little bit shiny. You are basically softening them:


Transfer the marshmallows to the bowl of your stand mixer. I have never tried to make this recipe by hand. I’m sure it would work but it will certainly be an arm workout!
I used the paddle attachment but the hook attachment would work as well. Add the shortening and turn your mixer on to low. Slowly add the icing sugar into the bowl. I say slowly because otherwise it will poof out all over your counter tops. (Speaking from experience)
Once all of the icing sugar is incorporated your fondant is ready to use! Simply take it out of the bowl and give it a quick knead by hand.

You can wrap it really well in cling film until you are ready to use it.


To colour your fondant flatten the piece out a bit and drop your food colouring in the center then fold it in half to spread the colours around before kneading. I found this little trick stopped the food colouring from just dripping out of the fondant when kneading.
Get creative! 
If you are simply covering a cake with your fondant you should have an easy enough time just rolling it out and smoothing it onto your cake (remember to use icing sugar to stop it from sticking to your counter).
I used my fondant to make a figurine so I came across a couple of tips as I worked on it.
I’m no expert on modelling with fondant, this was my first time trying to make a figurine but here is my first attempt: a fisherman for my boyfriend’s birthday cake 🙂

Enjoy this recipe and please share your ideas or questions below in the comments! I always love to hear from my fellow crafters 🙂

Happy crafting!

Hello crafters!
I have another great travel DIY project for you! In this tutorial I will show you how to paint your luggage to make it really pop! You will never have to worry about picking out your luggage from a crowd again 🙂
There are definitely plenty of different ways that you could paint your luggage, even print off an iron on transfer but this method seems like the cheapest option and I like cheap!

I use chalk to draw out my designs because it is really easy to remove with a damp cloth. It helps if you sharpen your chalk with a pencil sharpener so you can have a thinner outline for your design. Get creative with what you want to draw on your luggage. I recently decided I need a pet alpaca so I can make my own yarn but since that doesn’t seem to be happening any time soon I figured I could at least have one on my luggage!

I also used an index card to trace out rectangles for flags down the side of my suitcase so I can record the countries I have visited. The ratio for drawing a flag is typically 2:3 for your rectangle so keep that in mind. Living in Canada is so great and awesome but our flag has always been hard to draw thanks to that perfect maple leaf in the middle. For this part I simply traced a maple leaf from my computer and cut it out. Then I shaded over it with my chalk to make the perfect outline 🙂 Another reason to use chalk for your outlining!

Once you are satisfied with your design outline it’s time to start painting 🙂 To prepare your paint you will need to mix regular acrylic with fabric medium. The purpose of the fabric medium is to make your paint permanent so you won’t need to worry about your design getting ruined and you can even wash your fabric without losing the design. Fabric medium is available in most art stores; I got mine at Michael’s with a coupon 🙂
Mix two parts paint with one part fabric medium and stir it up with your paintbrush until it is combined. Read the label of your fabric medium to make sure that is the desired ratio for your product but I think all the ones that I have seen use a 2:1 ratio.

Get painting!
After you paint your luggage you need to wait 24 hours before you can heat set the paint. This is what activates the fabric medium and makes your paint permanent but your paint needs to be completely dry before you can do this step.
Get a small towel or pillowcase and lay it over your painting. Turn your iron on to the cotton setting and lay it on top of the painted material for about 20 seconds. Gently move it over to the next painted section and hold there for 20 seconds. Repeat until you have heated the entire painting.

Your design is now set and you can wash and dry your material without ruining your painting. While I might not be throwing my entire suitcase in the washer and dryer you could definitely do this with any bag or clothing. It is also a good idea for luggage anyway just to preserve the life of your work. You never know if you might be walking in the rain or snow with your luggage!

I hope this tutorial inspired you to paint something with acrylics! Let me know in the comments below if you have any questions or concerns. Or if you would like to share your creations I am always excited to see what my fellow crafters are up to.
Happy crafting!

Hello crafters!
Spring is just around the corner and that means it is time to deep clean the house. One area that definitely needs tending to is the drawer in my kitchen that is overflowing with plastic bags. I try to use reusable bags when I can but we all know that it’s impossible to remember to actually bring those things into the store!

I can’t think of a better way to deal with all these bags than to make plarn. Aka plastic yarn 🙂
Turning your grocery bags into plarn is the perfect upcycle as you can crochet or knit yourself (or a friend) anything out of these bags that would have otherwise just been sitting around taking up space and making you feel bad.
That’s all you need! I suppose I didn’t really need to make a list for that…
Start by folding your grocery bag into four the long way.

Cut strips about one inch wide from one end of the bag to the other.

Discard the strips that are unusable like the second strip from the left that has the handle hole in it.
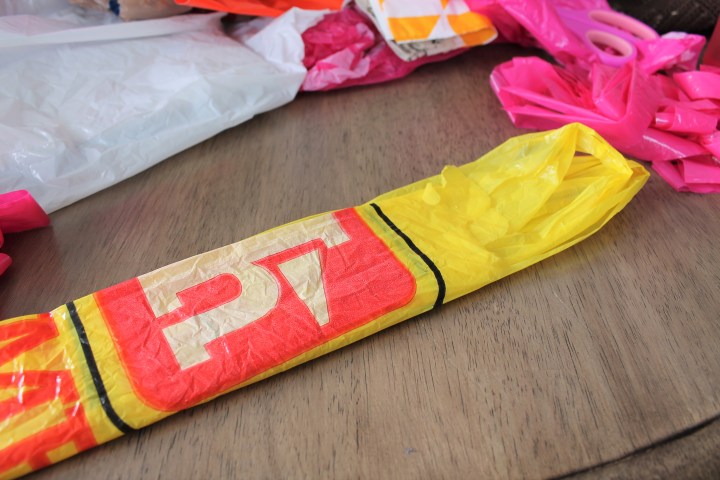
For bags like this one with handles, simply cut of the end with the handles and start from there.

Once you have a good assortment of strips cut it is time to assemble the pieces into plarn!
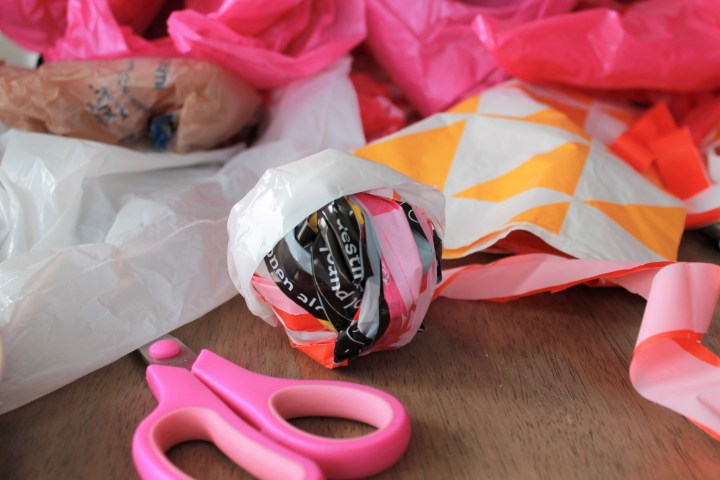
Each strip that you have cut should open up into a loop. Take two loops and pull one loop through the other from the bottom. Then insert the same end back into itself like this:

Pull the loop tight to seal the join but be gentle so that you don’t rip the bag.

And voila! You have made your own plarn!
I use a 16mm hook to crochet with this plarn as it is fairly thick to work with. You can do so much with this upcycle! Make totes, hats, rugs, or even a new grocery bag made of grocery bags! Check back soon and I will show you how I used my plarn to make a super cool recycled swim bag 🙂
As always I would love to hear your comments, questions and ideas for using plarn in the comment section below. Or you can always email me at Mataya@MatayaMade.com
Happy crafting!


Hello Crafters!
The best thing about being a crafter is that you can turn literally anything into a crafting oppourtunity. As soon as I plan an activity or start a new hobby I instantly start thinking of exciting DIY projects that I can make for it. My sister and I just booked a trip to England for the fall. 🙂
As soon as my flight was booked I wanted to make something for the trip and realised it was time to get cracking. Shortly after that I realised that the trip is almost a year away and I was getting way too excited. Oh well! Here is my first travel DIY project that I want to share with you, my embroidered luggage tag 🙂
This tutorial shows how to assemble the luggage tag but it doesn’t show you how to make the embroidery part. Use your creativity to make any image you want! I don’t know much about embroidery but I drew my image out on fabric and just filled it in with thread 🙂
Start by measuring a small border around your embroidered image. I made a 5mm border. Then get your felt and mark out a section that is the exact same size as your embroidered fabric. I use chalk to mark on dark surfaces like this black felt and you can just wipe it away after.

You will need two pieces of felt that are the same size. So repeat the above step. Cut out your felt shapes.
One of your felt pieces will be the back of your tag. Cut a window out of one felt piece. This window will be where your information card will be inserted.

You want the window to be slightly smaller than your information card so that the edges of the card will be held in by the felt. I traced my card onto the felt and then just cut the hole a few mm smaller than the rectangle I traced.
Now you need to layer together the whole tag and hold it in place so you can sew it. (I used paperclips!) But any pins would work.
Layer like so: embroidery / solid felt / felt with window


Sew around the two long edges and one of the short edges. I just used a wraparound stitch. A sewing machine would be a lot more effective but since I don’t have one 🙁 I sewed by hand!

To work the last edge you will be attaching the button flap while leaving the end open so you can insert and replace the information card.
To measure the correct size for the button flap I lined up the button with a small piece of felt.

Then fold the felt around to the front and cut it to size. You want the edge of the felt to come just to the edge of where your sewn border will be.

On the final edge use the same edging technique that you used for the other three sides but instead of going through all of the layers you will only sew through the embroidery layer and the first layer of felt. Once you get to the part where your button flap will be attached sew through the flap as well.
 Once you have completed all of your edges you will attach your button to the back of your tag and cut a button hole in the felt flap. I simply marked where the button would be with a bit of chalk and then cut a small slit in the felt.

The final step is to write your information on your card and insert it into your tag! I covered my card with packing tape so it won’t get damaged during travel.

There you have it! A totally unique luggage tag that will really make your luggage pop 🙂

As always please leave any questions or comments in the comment section below! Or email me at Mataya@matayamade.com I always love to hear from my fellow crafters 🙂
Happy crafting!

Hello crafters!
I’m sure most of you already have lots of homemade goodies to make your home cozy and relaxing (we are crafters after all!) but have you given any thought to another area where you probably spend quite a bit of time? That’s right people I’m talking about your car! There is no need to limit our crafting obsession to the household yay!
This flower pot oil diffuser is the perfect project to start accessorizing your car with. It is super easy to make and costs only a few dollars in supplies, plus look how cute it is! Not to mention it will infuse your car with soothing all natural essential oils 🙂
*You will need some basic crochet knowledge to finish this project*
Cut your sponge to fit as snugly as possible inside your flower pot. Trim little bits and pieces if you have to! It doesn’t matter if it is ugly because by the time we are done you won’t even see the sponge.

Once the sponge is cut to size trace the edge of your flower pot onto your felt. Cut out the circle of felt and set it aside. Put a small circle of glue around the edge of the sponge and glue the felt on top.

I cut my toothpicks to different heights to give my flowers some dimension but that is a totally optional step. Once you are satisfied with the length of your toothpicks get your white glue and spread a thin layer around the whole toothpick.
Take your embroidery thread (don’t divide the strands, just use the whole thread) and wrap it around the toothpick starting at the top. Only wrap the thread up to the part of the toothpick that will be going into the sponge. The part of the toothpick that will be hidden in the sponge will poke in better if it doesn’t have thread on it.
Once your toothpick is wrapped sew the end onto the back of the flower with a few simple wrap around stitches. Use the white glue to seal in any ends that might be poking out.

Repeat with your remaining flowers.
Now poke your flowers into the sponge and you’re done!
Depending on the sharpness of your toothpicks you might need to poke little holes in your felt with some sharp scissors to help the toothpicks push through.

The macrame holder is a little addition that I wanted to try out because I have seen a ton of really cool macrame plant pot holders online and I’ve been curious as to how they are made. This is extremely basic because I just kind of guessed at what I was doing but if you want to look up some macrame designs or if you already know some macrame knots go crazy!
Start with 8 strands of crochet thread. Make them the length that you want your hanger to be plus about an inch.
Tie a simple knot at the very end of your thread.

Section off your threads into pairs. Tie each pair together. This knot is going to be at the top rim of your flower pot so keep that in mind when you are deciding how far down to tie the knot. I put mine about halfway down the thread.

You want the next knots to be around the middle of your flower pot. Take one strand from one pair and tie it with one strand from the next pair like this:

Do this all the way around so that all of your threads are tied together.
To finish measure the thread against your flower pot and tie all the strands together with one big knot that ends up in the center of the bottom of your pot:

That was easy right? While you have your supplies on hand you might as well make a few extra because these little guys can go anywhere, don’t just limit them to the car! They would also make adorable gifts 🙂

Simply put 5-6 drops of your favourite essential oil at the base of the flowers on the felt. (I’m currently using eucalyptus 🙂 ) The oils will seep through the felt into the sponge and from the sponge they will gradually seep out of the terra cotta pot diffusing the scent throughout your car!
The scent lasts about 7-10 days so you might want to keep a stash of essential oils in your glove box for easy refills 🙂
Here are a few suggestions for essential oils that you could use :

Lemongrass: calms nervousness, eliminates mental fatigue
Lavender: stress-reliever
Cypress: energizing and refreshing
Eucalyptus: Make your car feel like a spa 🙂 Invigorating and cooling.
Blended essential oils are always a great option for diffusing as well!
I hope you enjoyed making this as much as I did!
Please comment below with questions, comments or ideas 🙂
Happy crafting!

Hello crafters !
This past week has been somewhat less than fun as I’ve been fighting with this cold that seems to be going around. Luckily I’ve made it out alive and now I’m in the final stages where the sore throat and painful coughing sets in.
I have always hated cough drops. They all taste awful to me and they all have that disgusting menthol taste 🙁 I can literally detect someone sucking on a Halls cough drop from a kilometer away. I finally found some that aren’t terrible at my local grocery store and they are literally just dried honey with orange flavour. Unfortunately they are four dollars for just ten cough drops! I’m far too cheap to purchase those again so I decided to take matters into my own hands. The solution?
DIY Cough Drops! I did a bit of research and snooping around and came up with this recipe which not only works but also tastes tolerable 🙂 Yay! These cough drops use only natural ingredients that you probably already have in your baking cupboard so I would like to say they are almost free to make? And on top of that you don’t have to worry about any sort of chemical or weird ingredient that you can’t pronounce. So let’s get to it!
To peel your ginger use the side of a spoon and the skin will easily scrape off 🙂 I pureed mine in my mini blender with a splash of water to help it mix up.
Before you begin set up a baking tray with some parchment and sift a thin layer of cornstarch over it to prevent sticking.

Mix all these ingredients together in a small pot.

Start it off on a high heat to get it boiling. Once it is boiling turn down to low and let it simmer until it is thick enough that it can be scooped into a big lump and mostly holds it shape. It will be like a very loose dough. (About 20 minutes)

Turn off the heat and use a spoon to grab a cough drop sized blob. *caution* the mixture will be hot don’t burn yourself! Roll the blob into a ball and gently press it between your palms to make it slightly flattened.

Place the cough drop onto your powdered parchment and keep rolling! You need to move fairly quickly as the mixture will harden very fast. I kept the pot on the lowest setting on the stove just to give me a bit of extra time.

Let your cough drops cool at room temperature until fully hardened.
When your DIY cough drops are COMPLETELY cooled mix them in some icing sugar to give them a non-stick exterior!
This recipe makes about 25 nickel-sized cough drops. If you want to make more I would suggest making separate batches as opposed to just doubling the recipe because you might have trouble rolling out more than 25 before the mixture hardens on you!
Enjoy!
LEMON: Rich in Vitamin C and boosts immune system. Lemon juice is also antibacterial so it will kill those sore throat germs!
GINGER: Ginger is a natural inflammatory to soothe swollen throats and it also breaks down mucus.
CLOVES: Cloves help clear out a stuffy nose and they are also a natural painkiller!
HONEY: Contains antioxidant, antibacterial and antimicrobial properties. Also boosts your immune system to help fight off that sickness.
Another quick remedy that helped me A LOT while I was feeling terrible is this quick hot bevvy that my sister told me about and it really soothed my throat and kept me hydrated. (Thanks Shannon 🙂 )
Make a mug of hot water and add lemon, fresh ginger slices and honey to taste. Sip on this concoction all day everyday until you’re healed.
Feel better!

Hello Crafters!
I know that essential oil recipes are not exactly classified as ‘crafts’ but I have to share these! I started using essential oils about a year ago and I love them. Not only are they a natural product, but each oil has all sorts of benefits and uses. A quick Google search of any oil will give you a ton of information on what to use them for. I have rounded up three AWESOME essential oil recipes that you can whip up at home to give yourself some natural homemade products.
Essential oils can be found almost anywhere these days as they are becoming more and more popular. Health and natural food stores always have them in stock but I find those sorts of stores tend to have higher prices. I purchase my essential oils through Amazon.ca. You can usually find suppliers that will pay the shipping for you as well! Just be sure to read the ingredients in the description to make sure you are getting 100% pure essential oils as some suppliers provide ‘blends’ that are not pure.
I have been a long time user of Nivea’s Nourishing Night Care cream and I love it but I realized that at the age of 25 I’m already wrinkling around the eyes so it was time to boost up my night cream. Why pay for an expensive anti-aging cream when you can easily boost up your regular cream with some all-natural essential oils?
If you want to make your own night cream you can easily use coconut oil or any other carrier oil as a substitute for store-bought cream.
Mix these ingredients together and keep in an airtight jar (or just the container that your carrier oil came in).

The amounts for this recipe are dependent on how much carrier you are using. For this container of night cream I added a tsp of Vitamin E oil and 8 drops each of frankincense and lavender.
(I’m no doctor! This is just great information that I found through research)
Frankincense has a ton of great skin benefits as it is a natural astringent. With regular use (for example a daily night cream 🙂 ) it reduces the appearance of blemishes and wrinkles, shrinks pores and lifts and tightens the skin. The scent of frankincense is also a natural stress reliever which makes it perfect for nighttime use. What’s not to love!
Lavender is also known for its wrinkle reducing benefits but it does so much more than that! Lavender oil contains antioxidants which flush your skin of the toxins that we absorb every day. It is also used to treat eczema and acne blemishes. It also tones and tightens the skin! This oil is great for all types of skin and is pretty useful for any skin condition.
Doesn’t everybody want thicker longer lashes and brows? I know I do! This serum is great for any hair growth so massage some into your scalp for extra luscious head hair too! Don’t want to make this yourself? Subscribe to my monthly newsletter to be entered into my lash serum giveaway and I might just send you a tube! (Current subscribers are automatically entered 🙂 )

Combine all ingredients and store in a clean mascara tube. I found these awesome mascara tubes for a decent price on Amazon.ca they come with their own little funnels that you can use to fill the tube without spilling.
Apply to eyelashes every night before bed.
Lavender oil prevents hair loss and improves blood circulation not to mention its soothing scent relaxes and calms.
Aloe gel contains an enzyme that revives dead skin cells. You can’t have good hair growth without a healthy base to grow the hair from! It also smooths and shines the hair that you already have, making your existing eyelashes and eyebrows shiny and healthy looking 🙂
Cedarwood oil is great for hair loss as it stimulates the hair follicles by promoting circulation. Not only is that great for this eyelash serum but it is also widely used as a hair loss remedy on the scalp.
Castor oil is well-known for its hair growth abilities. It is very rich in proteins, minerals and vitamins making it a natural magic potion for hair care.
I’ve been meaning to clean my earrings for a while now but I’m too cheap to purchase that expensive jewelry cleaner at the drugstore. Not to worry there is always a home remedy for these sorts of things and you can be sure that this cleaner will do an amazing job of safely and effectively cleaning your jewelry!


Lemon essential oil is commonly used in DIY cleaning projects; it is anti-bacterial and anti-fungal so besides the great fresh scent you can be confident that your jewelry is free of bacteria and germs, yay!
Thanks for sticking with me through this long post! Don’t forget to subscribe to my newsletter to be entered into the MatayaMade eyelash serum giveaway 🙂 Also visit the Member’s Page for a bonus Beautiful Legs Essential Oil Recipe!
You need to be a MatayaMade newsletter subscriber to access the Member’s Page! Find out more about my newsletter by clicking the ‘subscribe to my newsletter’ link in the above paragraph 🙂
Please leave your comments below, I would love to hear from you! As always you can email me at Mataya@MatayaMade.com if you have something to share.
Happy Crafting!

Hello crafters!
Lately I have been seeing galaxy themed art everywhere! I love the galaxy look; it’s creative and magical. I already shared my tutorials for a galaxy dreamcatcher and galaxy clay beads but I still feel unsatisfied! This tutorial will show you how paint a galaxy design and you can apply it to your own projects accordingly.
I’m painting on a canvass just to show you the painting process but get creative and galaxy paint whatever you want.
Some cool ideas that I’ve seen out there are a galaxy nightstand or dresser, galaxy bike, or even a galaxy picnic table!
When I do paintings I barely use paintbrushes; I use my hands, old pencils, or toothpicks. Really anything I can find lying around! This tutorial is no exception, you don’t need any paintbrushes just these
Let’s get started!
I am using a black canvass to make life easier but if your painting surface isn’t black you will need to paint a base layer of black over it. (Sorry you might have a to use a paintbrush for this step)
Start by dipping your sponge into your white paint. Dab some white areas onto the canvass (think of puffy clouds).

**The key with all of the colours in your galaxy painting is to not use too much paint. You want to some of the other colours to poke through each layer so that it blends nicely.**
Once you have some white on your canvass you can use whichever colour you want next. You just want to start with white so that the other colours will pop on the black background.
I like to use the darker colours first so I am going to do blue as my next colour.

Just like the white, apply blue paint to your sponge and dab it onto the painting. The best part is you don’t even need to use a new sponge or clean it! The colours will all blend together anyways so just use your dirty old sponge for all the colours! Yay!
With each colour change try to leave some patches their original colour and then for other parts feel free to blend the colours together. You can’t really go wrong with this part so do what feels right 🙂

Once you have dabbed on your pink, purple, and blue paint go back to your white paint and dab some on top of the colours to make the white pop.
Now that all the colours are in place it’s time to get some stars in there!
Grab your toothbrush and dip the bristles into your white paint. Pull the bristles back with your fingers to spray or flick the paint onto your canvass. Try to make star swirls or trails for a different effect!

*If your white paint is thick thin it out a bit with some water so that it flicks better*
And that’s how you paint a galaxy!
There are other things you could do if you want to put your own spin on it. Maybe sprinkle some glitter on the wet paint to make it extra starry. Or experiment with different colours like green or red to get a different effect. Even grab a toothpick and draw some white stars in by hand. The project is all yours 🙂

Please feel free to comment or ask questions in the comment section below. I would really like to hear what you are making with your galaxy painting skills.
Happy Crafting!


