Handcrafted Projects and Ideas


Receive MatayaMade's newsletter packed with tutorials, handcrafted ideas and FREE giveaways! Newsletter subscribers also have unlimited access to the Members Page Sign me up!


Hello Crafters!
Gosh, I have really been focusing on the handcrafted projects lately. But don’t be alarmed there are plenty of crochet projects going on behind the scenes which I will be revealing to you guys very soon!
I love projects that double as home decor, these chakra rocks will brighten up any bookshelf or window sill and they can even been used as part of your yoga practice if you want to lay them out beside your mat to really inspire a zen mood!
Now some people might find this whole chakra business to be a bunch of hooey. If you’re just here to paint some pretty rocks feel free to scroll down to the beginning of the tutorial 🙂
The whole basis of chakras is that they are the seven energy centers within our body. Starting at your tailbone and ending with the crown of your head. These energy centers spin (ideally) all at the same speed creating a balance in our bodies and minds. If one or more of your chakras is off it can create an unhealthy unbalance in the body.
Chakras can be balanced by nutrition, exercise, and meditation. Each chakra has its own group of things to keep it healthy. (I won’t get into too much detail but try looking up healthy foods/activities for each chakra if you are interested).


I started my rocks by dabbing the end of a pencil in the paint and dotting it on to make sort of a paint splatter effect. You could also sponge it on, drizzle the paint, or simply paint the entire rock. I wanted to keep some of the natural pretty rock colour which is why I chose the method that I did.

Once you have your colours all sorted out let your rocks dry completely before the next step.
A simple Google or Pinterest search will provide you with plenty of images of the chakra symbols. Some are pretty stylized which could be difficult to paint onto your rocks. I drew out my own designs that are a bit more simplified. Feel free to use my designs for your rocks.

Once you have painted your chakra symbols you just need to protect your hard work. Use mod podge or thinned out glue to seal your rocks. I used some clear matte finish spray paint that I had and it worked great!

Namasté and happy crafting!


Hello crafters!
I know I already shared a dream catcher tutorial with you but I’m totally obsessed! Might as well take advantage while the trend is still happening 🙂 This week I decided to try a little spin on the regular dream catcher style and make a personalized constellation galaxy dream catcher. I used the Sagittarius constellation because that is my star sign but you can use any constellation you would like. Even make one up if you would like, no one will know and I won’t tell!
Draw out your chosen design on a piece of white paper. Lay the wax paper over top of the drawing and tape the two papers together so they won’t move.

Gently squeeze a thin line of hot glue over the design. At this point I pressed some silver thread into the glue but by the end I decided to paint the glue gold anyway so the fact that I used the thread was kind of pointless. What I’m saying is, the thread is not necessary if you plan to paint the glue like I did but if you have a nice thread you can use and you don’t want to paint it then that will work too!

Let your design dry and gently peel off of the paper.
I threaded some white yarn around my hoop before I started to thread the dreamcatcher for two reasons. One: I wanted the rim of the dreamcatcher to be thicker and two: it gives the yarn something to grip onto when you thread the dreamcatcher.

To see how I thread the dreamcatcher check out my other dreamcatcher tutorial here.
Continue to thread the dreamcatcher around until the space in the middle is about the same size as your constellation.
Lay your constellation down on top of woven part of the dreamcatcher. Use a dab of hot glue to connect each of the points of the constellation to the dreamcatcher. On top of each dab of glue sprinkle some GLITTER 🙂 to mark where each of the stars of the constellation are.

If you need to, continue weaving the dreamcatcher until all the points of the constellation can be connected.
After this step was complete I painted the constellation gold.
Use whatever pretty galaxy yarn you chose to wrap the hoop. Secure the end with a dab of hot glue.

I also used to galaxy yarn to make a few braids and twists which I attached in Step 5 below:
When I made my bead strings I used fishing line because its stiffness makes it really easy to thread the seed beads onto it. I used a combination of seed beads and my clay galaxy beads. Once the bead string is complete simply put a dab of hot glue on the end to seal the beads onto the fishing line.

Get creative with the accessorizing. I’m sure you can find all sorts of glittery / colourful / galatic odds and ends around the house!
I would love to read your questions, comments, concerns, and/or ideas in the comments below! Please don’t be shy!
Happy crafting!

Hello Crafters!
I am doing a lot of experimenting with air-dry clay lately and these beads are my latest creation!
The galaxy theme is everywhere these days and I love it! It’s such a beautiful look and you can pretty much galaxy-fy anything with a bit of paint and GLITTER 🙂
These beads are pretty awesome for whatever project you use them for. If you want to see what I did with them keep your eyes peeled over here because that will be next week’s post!
To start I rolled small balls from my air-dry clay recipe that I shared last week. You can get the recipe here.
I used the stove-top method, rolled the dough into balls, and skewered them with a pin while they were still soft. Let them air dry.
Once you’ve handled those steps, head back over here and I’ll show you how to turn them into mini galaxies!
First lay down some wax paper or newspaper otherwise you’ll be getting paint all over the place.
Paint your beads with a dark blue, don’t worry too much about full-coverage, there will be plenty of paint on top of the blue and it looks good with some white parts! The blue paint just creates a base to start with.

Next use a paintbrush to flick white paint onto the beads. Simply dip in the paint and bend the bristles back like this:

The next step uses a really cool technique called :
Water marbling can be done with a few different types of paint, but for this project I’m using nail polish.
First string your beads onto fishing line (any string or wire will do the trick if you don’t have fishing line). Stringing the beads allows you to do multiple beads at once, time-saver alert!
Next get a small dish of water and sprinkle some of your gold glitter on top of the water. Open up your nail polish and drip a couple of blobs onto the surface of the water. Use a pin to swirl the polishes together. You should have something that looks like this:

(I forgot to put glitter in this batch, oopsie!) You can also sprinkle some glitter on the beads when you take them out of the water.
Now that your water is prepared, take your string of beads and dip them into the water until they are fully submerged. Lift them up out of the water and the polish with cling to the beads like this:

Now you can flick some more white paint on top and sprinkle some gold glitter for the finishing touch.

Have fun with your beautiful beads! Remember to check back next week to see what I did with my galaxy beads. If you want to share how you used your beads I would love to hear your ideas in the comments below! Also feel free to comment with any questions and I would be happy to help you out.
Happy Crafting!

Hello Crafters!
There are plenty of air-dry clay (or cold porcelain) recipes out there and believe me I’ve tested out a good handful of them! This tutorial showcases the two easiest and most successful recipes that I experimented with. Both recipes use air-drying to set the clay instead of the baking method. Personally I find the process of baking the clay far too tedious. I prefer to set and forget which is why I chose to share the air-dry method with you!
This recipe just seems to good to be true. In fact, it can barely be classified as a recipe considering it only contains 2 ingredients!

For this clay you only need cornstarch and white school glue. You barely even need to measure as the recipe is a simple ratio of :
Simply mix these two together in a bowl until they come together into a smooth mass with no lumps. Once it comes together in the bowl you will “need to knead” (heehee) the dough with your hands. The dough is a bit sticky so I sprinkled a little bit of extra cornstarch on my hands to stop it from sticking and it worked just fine.
After kneading the clay, powder your work surface with a bit of cornstarch (again to prevent sticking). Roll out the clay with a rolling pin or if you only made a small batch and you are lazy like me just sprinkle cornstarch on top of the clay, put a piece of parchment on top of it and grab a heavy book to just squish the dough out flat!
Grab some cookies cutters or a knife and cut out your desired shapes.
Lay the shapes out on a flat surface to dry.
*If the clay is extremely sticky while mixing just add some more cornstarch
*The clay tends to curl up on the edges while it dries. To make sure your shapes dry flat you will need to periodically flip them over while they are drying.
This recipe is a little bit more involved than the 2-ingredient clay but it is still super simple and still uses ingredients that you probably already have in your kitchen. I found the two recipes to have similar results but this stove-top method dried out a bit faster than the 2-ingredient clay.
Combine in metal bowl:
Mix in 1/2 cup cornstarch until smooth.
It should look like this:

Place the bowl with your clay mixture over a double boiler. Gradually increase the heat while stirring.
The clay is ready when it comes away from the sides of the bowl.
Like this:

Put cornstarch on your hands to prevent the clay from sticking to your hands. Knead the clay until smooth.
Wrap the clay in plastic wrap until you are ready to use it!
*Like the 2-ingredient clay this clay will curl a bit when it dries. Just occasionally flip over while drying.
*When heating the clay on the double boiler be sure to very gradually increase the heat to avoid lumps.
*If the clay is too sticky mix in some cornstarch.
While I made magnets with my clay, that is just the tip of the iceberg! No matter what you made with your clay, here are some tips for finishing off your creation:

Any questions, comments, or ideas? I would love to hear them below in the comments section!
Happy Crafting!

Hello Crafters!
We already know that giving and receiving handmade gifts is fun and exciting, to step it up a notch have you tried signing your handmade work?
This week I will show you three easy and beautiful ways to sign your own crocheted, sewn, and handcrafted projects!
(Best for crochet / knit items that you cannot sew directly onto)
This method requires you to do a little bit of free-hand sewing. But don’t be alarmed! Just sketch out your design with pencil and sew over top of it using back-stitch (or whatever stitch you find easiest to use).

Unfold the bias tape and choose one of the middle sections to do your sewing on.

Mark out your design (or just start sewing if you are brave!). I used a simple back-stitch for this tag.

Fold the bias tape back into a single strip and fold in half to make a tag. Simply sew the edge onto the edge of your finished project (blanket, pillow, scarf, etc.)
This method is awesome for your cross stitch projects because the cross stitch font will blend perfectly with your existing cross stitch design. It would always work great for any embroidery project or really anything on fabric that you can sew onto!
I have provided two difference cross stitch fonts for you to use. Simply subscribe to my monthly newsletter to gain access to the download.

Sign up for MatayaMade’s monthly newsletter HERE. Once you have gone through the sign-up process you will arrive at a welcome screen with the password to my members page.
Subscribers to the MatayaMade newsletter always have access to the members-only page which is updated with new goodies all the time!
This is probably one of my favourite gifts that I bought for myself (we all deserve to buy ourselves gifts every now and then!) Make up whatever design you want, you can be totally creative and think outside the box.
Then send it off to a stamp maker and get your awesome personalized stamp in the mail and start stamping everything! I especially love using my stamp for birthday cards and the backs of all of my paintings 🙂

I got my stamp on Amazon.ca (here’s the exact link) but there are loads of great options on Etsy and other sites. Just Google search ‘personalized stamps’ and pick whatever option suits you.
How do you personalize your projects? I would love to hear some of your great ideas in the comments below.
Happy Crafting!


Hello Crafters!
I can’t get enough of wildflowers! In a desperate attempt to preserve summer I will press as many flowers as I can get my hands on. Every time I’m out walking my dog I end up with a handful of new wildflowers to press for a future project. (I haven’t decided on the project yet but when I figure it out there will be more than enough flowers to do it!)
At first I just stuck them inside my heaviest books and hoped for the best but that didn’t work out too well. Most of the time I ended up with a few too many moldy book pages…
Clearly you need to remove some of the moisture from your flowers to create perfect end results. This post will show you five of my best tips to get perfectly pressed flowers every time, so let’s get to it!
My first tip is an easy one: press your flowers as soon as you get them home! Once the flowers have wilted in your sweaty grasp they won’t look nearly as beautiful as they could and you are trying to preserve their natural beauty right?
If it took you longer to get home than you thought don’t give up on your wilted blooms just put them in a bit of water to spruce them up but be sure to dry them off with paper towel before pressing them because you don’t want any excess water messing up the pressing process.
Regular white paper might do the trick with the drier, easier to press flowers like pansies but if you have something a little juicier I can guarantee it will rot inside of a book. To draw out that extra moisture put the flowers in tissue paper (like the kind you put in gift bags) then put regular white paper on top of that and then put your flowers in the book.
Newspaper works just as well but I wouldn’t recommend using it for lighter coloured flowers because the newsprint might mark the petals.
The flower sandwich should look like this:
white paper / tissue paper / flowers / tissue paper / white paper
After a couple of days take the flowers out of the tissue paper and replace the white paper with two sheets of fresh white paper and stick back in the book for a few more days to finish flattening.
I know this sounds crazy but it is very effective to use your iron to speed along the pressing process. Put your flowers between two sheets of regular paper and with your iron *on the lowest driest setting* gently press the iron on top of the paper and hold for about ten seconds. Don’t move the iron around just hold it in position, once the flowers are ironed simply place them in a book like you would have if you didn’t get this awesome tip. The ironing helps start the flattening process and also dries out the flowers so that they won’t get moldy in your book.
Struggling to make your flowers stay flat? Put your flowers face down on the paper and gently press them flat with your hands before folding the paper over. If you place them face down you have less chance of folding over the petals by accident when you put the paper on top.

After you press your flowers you will be pretty impressed with your work. You want them to stay vibrant and beautiful for all of eternity. To make sure they don’t lose their colour you should seal your flowers. There are a few different things you could use as a sealant.
The most common sealer would be Mod Podge, but I would suggest watering it down to more of a glaze so you don’t damage the flowers when brushing it on. You could also water down regular school glue for a similar effect. One craft supply that I always have on hand is matte clear spray paint which would work great as well.
The best way I’ve found to store pressed flowers is between paper towel because it keeps any moisture out. Then just slide the paper towel into a clear page protector to keep your beautiful flowers safe!
Now that you have perfectly pressed flowers what will you make with them?
Some awesome projects that I’ve seen are sun-catchers, coasters, gift tags, artwork, and clay magnets, just to name a few!

I would love to hear your project ideas in the comments below!
Happy Crafting!

Hello Crafters!
Today’s post is wedding themed! I have never been to a wedding before, not even as a regular guest. But this fall my best friend from high school is marrying her high school sweetheart. Well technically her middle school sweetheart because they have been dating since forever!
I’m going to be a bridesmaid at my first ever wedding so I imagine it will be one I definitely won’t forget! This weekend is the bridal shower and I decided to make a helpful (but cute) wedding day survival kit.
Read through to the end of the post to get two free downloadable tags for your own wedding kits!
I chose to use a makeup bag to carry all the survival tools just to be practical but you could use a cute basket, a crate, or a wooden box. Really anything that you think the bride will love!
 This list contains all the items that I put in my kit plus some cool ideas for other items that I thought of after the fact:
Once you have all your goodies ready and packaged just simply finish it off with a cute gift tag. I made mine by hand but if you don’t trust your artistic abilities or if you just don’t have the time here are two free downloadable gift tags that I created for you to use!
 Click Here to Download This Tag
 Click Here to Download This Tag

Happy Crafting!

Good morning crafters!
Who else is loving the dreamcatcher trend that is catching on lately? They are everywhere; tattoos, drawings, pillows, and of course hanging in your windows and on your walls!
Today I’m going to help you make your own crochet center dreamcatcher because they are super easy to make at home and purchasing one of these babies will cost you an arm and a leg.
I used sock yarn because I’m not smart and didn’t realize how ‘felty’ it would be. It’s a pretty colour though 🙂 I would recommend using cotton or crochet thread!
I used Patons Kroy Socks FX in ‘Cameo’ and a 3.75mm hook.
To begin you will need to make a magic circle. If you forget how just click over to this tutorial where I show it in the first step.
Into the magic circle:

Chain 6. (counts as 1DC and 3CH) 1DC in same stitch. Chain 1.
**Skip next 2 stitches and (DC, CH3, DC) into next stitch (indicated with orange pin)
 Chain 1.** Repeat from ** to ** until end of round.
 Slip Stitch in 3rd chain of the first DC to end the round.
SS into next space. CH3 (counts as a DC), 2DC, CH3, 3DC into same space.
 *Slip Stitch into next space (indicated by orange pin). 3DC, CH3, 3DC into next space.*
Repeat from * to * around.
 SS into the last space. SS into the 3rd CH of the first DC.
SS into each stitch across until you get to the next space.
Chain 3, (DC, CH3, 2DC) into first space.
 Chain 5. *2DC, CH3, 2DC* into space on top of next petal.
 Chain 5. Repeat from * to * until end of round.
 SS into 3rd chain from the CH3 at the beginning of round to end round 4.
Chain 3. (counts as a DC), DC in next DC
Work ** (3DC, CH3, 3DC) into the top of the last petal.
 Sorry the picture is blurry, I didn’t realise until I had taken all the pictures!
DC into each of the next 2DC. SS into next space. DC in each of the next 2DC.**
Repeat from ** to ** around until end of round. SS to close.

SS in next 4DC and in next space. (Basically SS until you are at the point of the last petal)
(2DC, CH3, 2DC) in same space.
**CH5, SC into the SS from the previous round, CH5**
Repeat around. SS to end the round.

Wow look at how much better it looks blocked!
I know I say this every time but you need to block this work really badly! It curls up while you are doing it and it won’t look as beautiful if you try to put it in the dreamcatcher without blocking it first.
Tie the yarn anywhere onto the rim. Wrap it around like this:

Once you go around the rim once pull down one of the loops.
 Pull the yarn through the back of the loop.
 Then pull the thread through the loop you just made:

I recommend leaving your crochet center with all the pins in it. It is already stretched out perfectly and held in position so just place your ring around it and continue to weave your string around like you did for the rim of the dreamcatcher just weave into the crochet center at the points of the star and any other spot that needs to be held in place.

Now you are done weaving it’s time to accessorize!
I wrapped embroidery thread around the rim (just seal off with a dab of glue). I also made bead strings with a bunch of seed beads and embroidery thread. I just put some white glue on the end of the thread so that it hardened into sort of a needle and it was really easy to thread the beads on! Fishing line would also work great!

Add whatever other embellishments you have around the house; feathers, fabrics, etc. Be creative!
Subscribe to my monthly newsletter to get awesome project inspiration every month and to be entered into my giveaway for this super mini crochet center dreamcatcher keychain!
 Find out more about the MatayaMade newsletter (including how to join) right here.
I would love to hear about how you personalized your dreamcatchers in the comments below. Also feel free to ask any questions about this tutorial if you are running into trouble with any of the steps.
Happy Crafting!

Hello Crafters!
Today I am going to show you how to make this super cool bicycle string art to give your walls a little punch of colour 🙂

First paint your wood if desired! I painted mine yellow and I will paint the edge after the string art is complete so I can pick a colour that complements the colours of string that I used.
Next take your design template and tape it to the wood so it doesn’t move out of place.

*Note* If this is your own design and you want to use it again I would strongly suggest making a copy of the design because you will most likely rip the paper when you are removing it over the nails. I just scanned my original onto a sheet of white paper.
Now the fun part; hammering things 🙂
Hammer nails into the dots on your template. I made the dots very close together on my downloadable design so unless you have very small nails I would suggest nailing only into every second dot like I did.
Do not hammer them all the way in as you will need to wind the string around them. I would leave about 1/8 of an inch sticking out. Next remove the paper by simply peeling it off over the nails. I had some trouble removing the paper because the nails stapled some parts down so if you need to reach in between some of the nails to grab stray bits of paper just grab some tweezers!

Now that you have your nails in place it is time get excited about your colourful thread!
To start each new colour of thread I simply tie it to the nail and put a teensy dab of hot glue to make sure it doesn’t come loose. You don’t want the glue to be visible but don’t worry too much because most of the nails will have so much thread wrapped around them that the glue will be covered up.
Once the thread is fastened onto the nail start winding! Be creative with how you want to wind the string. You can do zigzags back and forth between nails or just wrap around each nail as you go for a clean finish. This is the part where you can be creative and make your bicycle art your own!
To end a strand of thread I basically did the same thing that I did to start it; tie it off on a nail and put a dab of hot glue.

Wow! It’s looking like a bicycle 🙂 Now you can add finishing touches to make your project come together. Paint the edge of your wood, paint the heads of the nails, or write an inspiring quote around the bicycle. Use your imagination!
 I would love to hear about how you personalized your string art in the comments below, also if you have any questions/comments about this project feel free to leave them in the comments below as well!
Happy Crafting!
Hello Crafters!
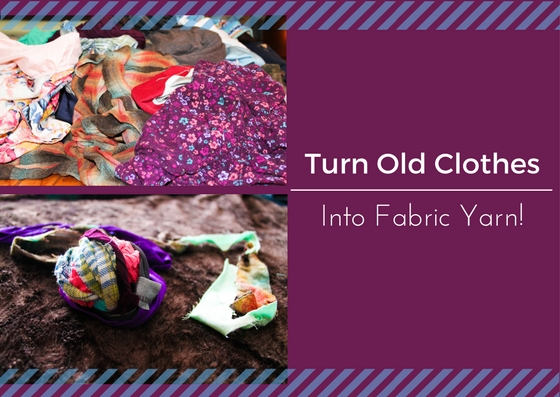
Today I’m in spring cleaning mode; I feel like getting rid of everything I own so my house can be clean! One big nuisance that most people come across when cleaning is the dreaded ‘old clothes’ pile. I don’t wear them, I don’t fit in them, and I can’t bear to throw them out!
Of course there is the obvious option of donating them, but most of these clothes are ripped or worn so instead let’s…
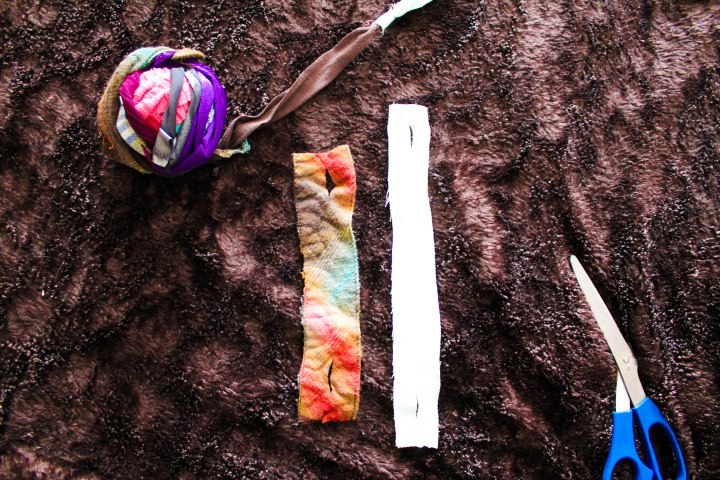
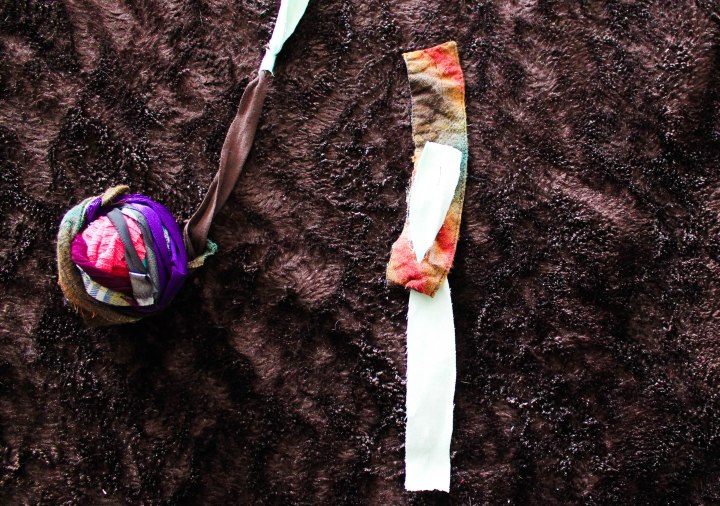
The first thing you want to do is cut all your clothes into strips. The length isn’t too important just cut into whatever strips are possible based on the garment you are cutting! I would recommend that for width you go with about 1 inch so that your thin fabrics will still be strong.
Cut a small slit in each end of the fabric strip like in the picture!
Next you want to insert one strip into the slit you cut on the other strip. Insert it from the back of the hole and pull it through.
Next fold the strip forward and insert the end into the cut that you made on the same strip.
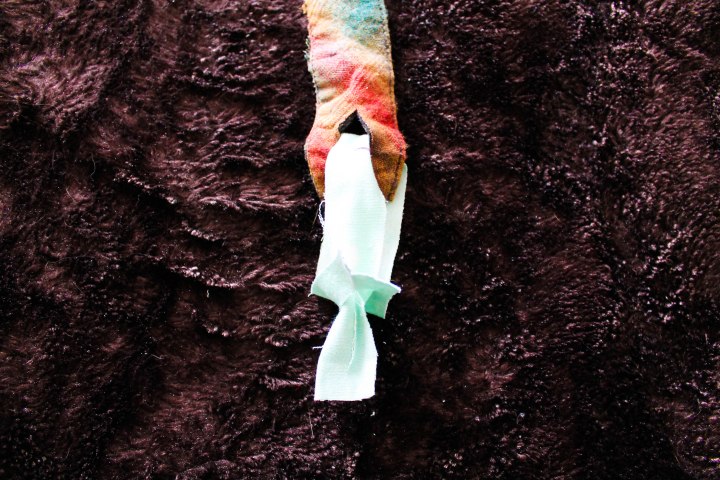
Gently tighten the fabric until you have a continuous strip!
That’s it! This is a really easy way to turn your clothes into yarn but it does take a while to cut all your clothes into strips. (Especially when they have zippers and buttons and such!)
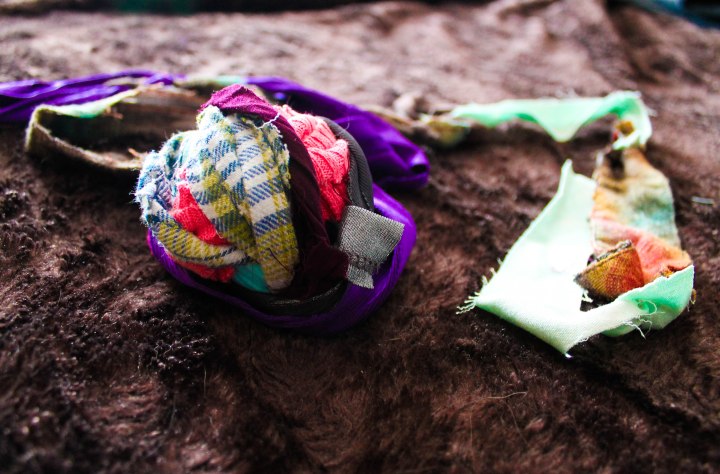
It takes a bit of patience but it will be so worth it when you have your fabric yarn ball completed and you can use it to make whatever cool project you want!
I think I’ll be making mine into a braided rag rug so be on the lookout for that coming up!